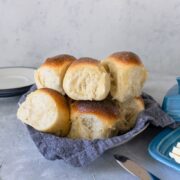
These homemade yeast rolls are so soft and tender that they will melt in your mouth. Delicate artisan bread rolls are perfect with any meal and are best with a pad of melty butter in the middle!
The holidays are here and that means so are all the goodies and treats. And that includes homemade yeast rolls!
Whether it's your Thanksgiving table or Christmas, these artisan yeast rolls made from scratch will BLOW YOU AWAY!
I love a lot of things I make. OBVIOUSLY. lol. That would be silly if I had this site and didn't. But there are some moments when I really nail it and kinda surprise myself.
And this recipe did that. When Justin came home the day I tested these, I told him immediately he had to try one and he proceeded to eat like 6! ? He really is the best taste tester!
These rolls are soft and fluffy and tender and have such a delicate flavor and oh my gosh THEY ARE SO GOOD! Perfect for the holidays. Perfect for a dinner party. Perfect for a Wednesday night when you want to treat yo self.
Let's get to baking!

Ingredients Needed
You just need a couple of staple ingredients:
- Yeast
- Water
- Sugar
- Salt
- Olive Oil
- Flour
- Butter
PRO TIP - Make sure you have fresh yeast. If your yeast is old then the dough will not rise properly. Resulting in sunken dense rolls. If your yeast does not bubble at the beginning of the recipe with the water and sugar, your yeast is bad and you need fresh. Always store your yeast in the fridge too to keep it fresh.


How to Make
- Combine yeast, ½ cup of water, and sugar. Let rest in a large stand mixer for 5-10 minutes until bubbly.
- Add the rest of the water, salt, and oil. Start the mixer with the dough hook on and slowly add flour. Once all the flour is added, knead for 5 minutes (with a dough hook or by hand). If the dough is still sticky add in the last ¼ cup of flour until the dough isn't sticky.
- Oil a large bowl with oil. Add in the dough and cover on all sides with oil. Set in a warm dry place with a towel on top and let rise for 1 hour or until doubled.
- Punch the bowl down. Divide into 20 equal size pieces (about 2 ounces each). Form into smooth equally sized round balls and place in a 9x13 greased baking dish together. Let rest on the counter under a towel for 30-60 minutes.
- Preheat oven to 400 degrees.
- Place in the oven and bake for 20-25 minutes.
- When finished, take the bread out of the oven and brush the tops with melted butter.


How to Prep and Make Ahead of Time
Yes, you can! Homemade and artisan bread is a great thing to make ahead of time! There are a couple of different ways to do so.
ONE - FREEZING THE BREAD DOUGH
Once you have done the first rise (step 4), continue placing the dough balls into a baking dish like you are getting ready for the next rise. Wrap tightly in plastic wrap 3 times and then wrap in foil. Store in the freezer for up to 3 months.
When ready to continue, remove from the freezer and let thaw in the fridge for 24 hours. Remove from the fridge, unwrap, let come to room temperature, and rise for 1-2 hours on the counter. Bake as directed.
TWO - MAKING THE DAY BEFORE
If making the day before, make it all the way up to baking. Place the baking dish in the fridge wrapped tightly in plastic wrap. Store in the fridge overnight. When ready to make the next day, let sit on the counter to come to room temperature and rise for 1-2 hours, and bake as directed.

Tips for Making Bread
I learned a couple of things along the way to help in the bread-making process.
- Make sure you have fresh yeast. If your yeast is old then the dough will not rise properly. Resulting in sunken dense rolls. If your yeast does not bubble at the beginning of the recipe with water and sugar, your yeast is bad and you need fresh. Always store your yeast in the fridge too to keep it fresh.
- Use a high-powered stand mixer. Bread dough is tough and it requires a lot of power from a stand mixer. My Kitchen Aide honestly isn't strong enough. I use my Nutrimill Artise mixer for any bread I am doing. If your mixer is struggling, remove it and knead it by hand. Don't blow out your mixer motor. (affiliate link)
- Don't rush the rises. I know it is a lot of time for rising and a time-intensive recipe. But trust me it is worth it! The patience will pay off!
Recipe
Homemade Yeast Rolls
- Total Time: 2 hours 45 minutes
- Yield: 20 1x
Description
Homemade yeast rolls are so soft and tender that they will melt in your mouth. Delicate artisan bread rolls are perfect with any meal and are best with a pad of melty butter in the middle!
Ingredients
- 2 ¼ Teaspoons Yeast
- 1 Cup + 2 Tablespoons Water - warmed to 115 degrees
- 1 Cup Flour + 2 Tablespoons
- 2 Tablespoons Sugar
- 1 ½ Teaspoon Salt
- 2 Tablespoons Olive Oil +1 Tablespoon for the bowl
- 3-3 ¼ Cups Flour
- ½ Stick Butter - melted, for inside and outside
Instructions
- Combine yeast,½ cup of water, and sugar. Let rest in a large stand mixer for 5-10 minutes until bubbly.
- Add the rest of the water, salt, and oil. Start the mixer with the dough hook on and slowly add flour. Once all the flour is added, knead for 5 minutes (with a dough hook or by hand). If the dough is still sticky add in the last ¼ cup of flour until the dough isn't sticky.
- Oil a large bowl with oil. Add in the dough and cover on all sides with oil. Set in a warm dry place with a towel on top and let rise for 1 hour or until doubled in size.
- Punch the bowl down. Divide into 20 equal size pieces (about 2 ounces each). Form into smooth equally sized round balls and place in a 9x13 greased baking dish together. Let rest on the counter under a towel for 30-60 minutes or until nearly doubled in size.
- Preheat oven to 400 degrees.
- Place in the oven and bake for 20-25 minutes.
- When finished, take the bread out of the oven and brush the tops with melted butter.
Notes
- Store leftovers covered in the fridge for 2 days
Making Ahead of Time
- FREEZING THE BREAD DOUGH - Once you have done the first rise (step 4), punch down in the middle and shape it into a ball. Wrap tightly in plastic wrap 3 times and place inside a freezer-safe bag. Store in the freezer for up to 3 months. When ready to continue, remove from the freezer and let thaw in the fridge for 24 hours. Remove from the fridge, unwrap, punch down to release any air bubbles, and continue with the directions from the recipe from step 4 on.
- MAKING THE DAY BEFORE - If making the day before, make it all the way up to step 9. Place both loaves on a baking sheet lined with parchment paper and wrap them tightly in plastic wrap. Store in the fridge overnight. When ready to make the next day, let sit on the counter to come to room temperature and rise for 1-2 hours, and bake as directed.
- FREEZING BAKED BREAD - When the cheese bread is baked and fully cooled, wrap it tightly in plastic wrap 3 times and aluminum foil on the outside. Store in the freezer for up to 3 months. When ready to eat, place in the fridge to thaw for 24 hours. Remove unwrap and place in a 200-degree oven for 10 minutes to warm back up. Slice and serve!
- Prep Time: 20 minutes
- 2 hours:
- Cook Time: 25 minutes
- Category: Bread
- Method: Baking
- Cuisine: American
Nutrition
- Serving Size: 1
- Calories: 130
- Sugar: 1.3 g
- Sodium: 175.5 mg
- Fat: 4 g
- Carbohydrates: 20.5 g
- Fiber: 0.8 g
- Protein: 2.8 g
- Cholesterol: 6.1 mg