A deep fried turkey will change your life and is a delicious way to achieve a juicy, tender and unbelievably flavorful bird for Thanksgiving. Say goodbye to a dry and sad baked bird! It all starts by injecting a whole turkey with a butter marinade and refrigerating it for 24 hours. Cooked in a stock pot (outside!) in peanut oil at 350 degrees and fried for 3 ½ minutes per pound (for example, a 13-pound turkey will take about 45 ½ minutes). The recipe includes directions on clean-up and oil disposal.

My Unhealthy Obsession with Fried Turkey for Thanksgiving
I'll admit it...I have an obsession with fried turkey. And I am not sorry about it. If you've ever had one, you know. It's life-changing, and once you taste it, you'll never want to go back to a dry oven-roasted bird again.
I still remember the first time my dad fried a turkey. I expected something heavy and greasy, like fried chicken, but I was so wrong. What came out of that fryer looked dark and crisp, but the first bite proved it was tender, juicy, and packed with flavor. From that moment on, I knew my Southern Thanksgivings would never be the same.
Now it's a family tradition, and I'm here to show you exactly how my dad taught me to safely fry a whole turkey...crispy skin, juicy meat, and all. Pair it with Sweet potato casserole with crunchy cornflake topping and frozen broccoli casserole with Velveeta for the ultimate southern Thanksgiving spread!

First, You Need Some Special Equipment
You need a turkey fryer. Or a really deep and large stock pot that can be used on an outdoor propane burner. This fryer is similar to the one we have (affiliate link*) - I recommend this one because it comes with everything you will need to safely fry a turkey outside. Things you need included are:
- burner with timer
- gallon pot and lid
- oil thermometer with a long stem
- basket for the inside with a handle
- bird skewer plus handle
- extras you will need: marinade injector, disposable gloves, plastic wrap, high heat or grilling gloves, cardboard boxes, lighter, trash bags, paper towels, large wide-mouth funnel
Welcome to My Back Yard - This is the Prep You Need To Do FIRST!
⭐️YOU MUST DO THIS STEP FIRST⭐️ Measuring the Pot for Oil! This step is super important and you need to do it first! Water displacement is the best way to know how much oil you need to fry your turkey.
- Once you have bought your turkey, place it inside your frying pot and fill the pot up with water until the bird is covered. Use can use your outdoor yard hose or a bathtub to make this easier than trying to do it in your kitchen sink (unless you have a big and deep sink).
- Remove the turkey from the pot and with a sharpie, mark on the outside of the pot where the water line is. Dump the water out.
- When it is time to fill up the pot with oil, fill up to this line. Using a water displacement method BEFORE you start frying is super important! DO NOT fill the pot up with oil, heat up, then place your turkey in unless you have measured how much oil you need. This will help prevent fires and hot oil from spilling out if overfilled.

Second, the Turkey Prep
The second most important step of this process is allowing for enough time to thaw the turkey thoroughly before cooking! You do not want to fry a frozen or partially frozen turkey!
- Place your frozen turkey in the fridge to thaw 7-9 days PRIOR to the day you need to cook. It takes about a week (give or take depending on how big your bird is) for a turkey to thaw out. A couple of extra days won't hurt.
- 24 hours before frying, remove from the fridge. Unwrap and remove any gravy packets, neck, and or giblets that are inside your turkey. Pat dry with paper towels and place in a large disposable pan or on a large baking sheet.
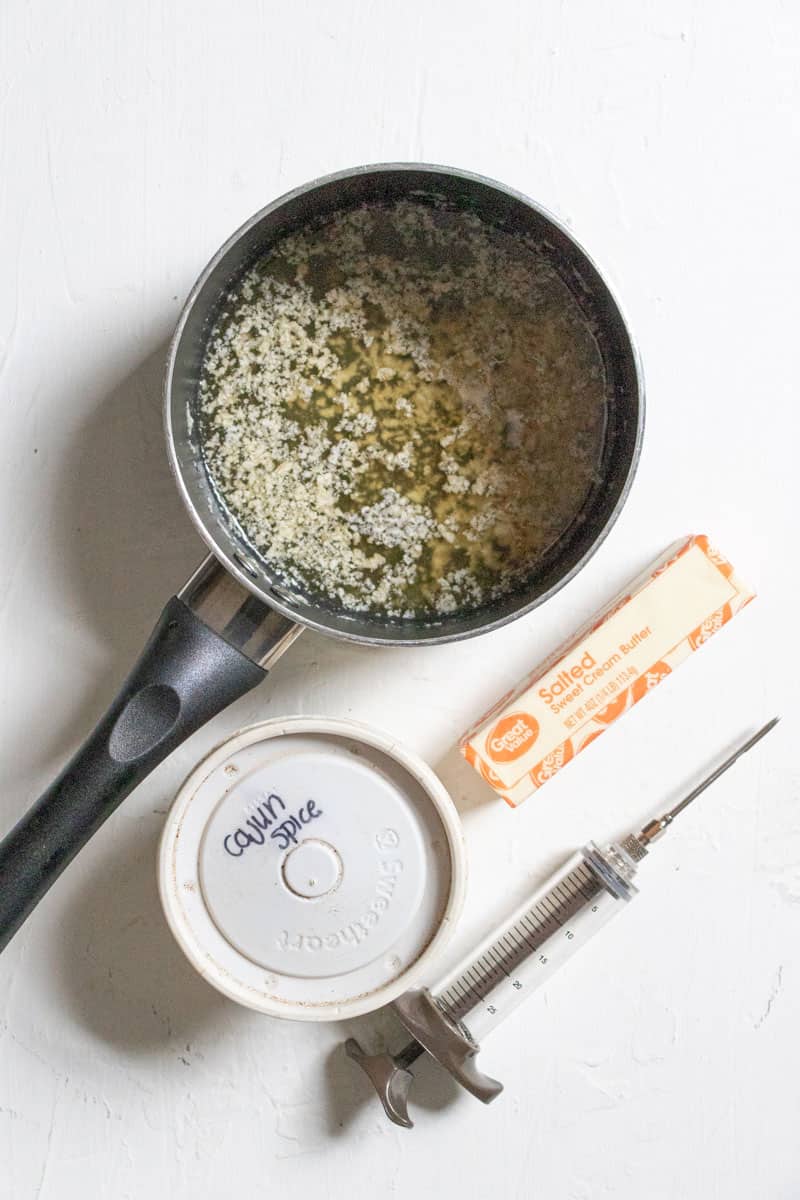
- Add a stick of butter to a small pot and place it on the stove on medium heat. Cook till melted then remove. Add garlic powder and white pepper to the melted butter and whisk completely to mix in.

Next, rub the turkey down with a cajun spice blend. Make sure to get it all over the outside, under the skin, around the legs, and cover as much of it as possible.

Third, It's Finally Time to Fry!
Once you have measured the oil, prepped the bird, and gotten your frying station ready - it is time to start frying! I set up some old cardboard boxes in the middle of the driveway away from anything. The cardboard will help catch any oil spills and make cleanup easier.

Make sure you read the instructions to your specific fryer PRIOR to setting this up.
- Remove the turkey from the fridge and place it on the countertop for at least 30 minutes to come to room temp while you get your frying station prepped.
- Fill your pot up with peanut oil to the fill line you marked on the outside of your pot. Place the inside frying basket inside. Place on top of the burner.
- Open up the propane tank, turn the timer on, press the starter, and light the burner. Make sure the propane valve is switched all the way open to ensure a large flame.
- Once the burner is lit, place the thermometer inside the pot, place the lid on, and keep a watch on it while the oil heats up. This will take about 30ish minutes to reach 350 degrees. If your fryer has a timer on it (ours has a 15-minute timer - once those 15 minutes are up it flips off, killing the flame), keep an eye on it, turning the timer back every so often so that the flame stays going.
- Stay by the fryer at all times while this is heating up and the bird is cooking.
- Once the temperature of the oil has reached 350 degrees, the bird is ready to fry. Place the skewer through the middle of the bird, place it back on the baking tray, and bring it outside. Remove the lid from the fryer, place the hook on the skewer and very slowly lower the bird in the oil. The oil will bubble and splatter as you are lowering, just do it slowly so as not to burn yourself or splash any oil over.
- Once the bird is fully in the oil, remove your hook, place the lid back on, and start the timer for the exact cooking time - REFERENCE COOKING TIMES BELOW - you will fry for 3 ½ minutes per pound of turkey you have.
- Keep watch of the turkey while frying. Keep the timer and flame going. Do not leave it unattended. Get a clean pan or baking sheet for the cooked turkey, and place it directly next to the pot until needed.
- Once the time is up, gently remove the lid (wearing grilling gloves - it will be hot) hook the skewer, and slowly lift the turkey out of the oil. Raise up slowly so that all the oil drains from the middle of the bird. Hold directly over the pot the entire time so the hot oil goes back into the pot.
- Once most of the oil has dripped off, carefully place it on the clean baking tray.


Cover the pot with the lid. Turn off the flame and timer. Shut off the propane completely. Leave be to let cool for the rest of the night. Bring the turkey inside and let rest for 20 minutes.
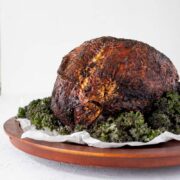
Once you have let it set, place the turkey on a platter, or carve the meat prior and place it on a platter to serve! The inside will still be hot, so I recommend using multiple pairs of disposable gloves while carving for the turkey since it will be very hot.

Frying Times Cheat Sheet
It takes 3 ½ minutes per pound of turkey that you have to fry and cook completely.
10 Pound Turkey = 35 minutes
12 Pound Turkey = 42 minutes
13 Pound Turkey = 45 ½ minutes
15 Pound Turkey = 52 ½ minutes
20 Pound Turkey = 70 minutes

Last, How To Dispose of the Oil After Frying
Leave the frying station to cool for 12-24 hours. I always like to leave for 24 hours just to make sure everything is completely cool. This can be a messy process but after several years of doing this, this is what I found best to work for me.
If this is your first time using your peanut oil, you should be able to get another use out of it. If your oil comes in a big 3-5 gallon, you can store it back in the same bin.
- Place the propane tank and burner away. Gently remove the inside frying basket and let drain oil as much as possible. Place on a trash bag to clean.
- Do this step over the cardboard that is still laid out. Place multiple trash bags over the cardboard area. Place the oil container over the trash bags.
- Using a large funnel (with a deep and wide mouth), place it over the opening of the oil container it came in. Slowly and carefully (and with help if you need it), pour the oil from the pot into the mouth of the funnel. Pour all of the clean oil back into the container, making sure to leave the bottom 10% out. That will have the bits and pieces that have settled to the bottom. Screw the lid back on the oil container and store it away. Pour the remaining oil and remains into an old container with a lid. Wipe down the pot and liner down with paper towels as best as you can. Throw the used paper towels, trash bags, old oil, and cardboard away.
- Wash the inner liner, pot, and lid with Dawn dish soap outside with your hose. Wash and scrub everything down to cut and remove the grease. Wash the thermometer and hooks as well. Rinse everything and dry completely.
- Store away as desired.
If you need to dispose completely of your oil - check online to see if your city recycles peanut oil. If not, place the used oil in a container with a lid tightly on it and dispose of it in your regular trash cans.


Recipe
How to Fry a Whole Turkey (in peanut oil)
- Total Time: 24 hours 45 minutes
- Yield: 10-12 1x
Description
A deep fried turkey will change your life and is a delicious way to achieve a juicy, tender and unbelievably flavorful bird for Thanksgiving. Say goodbye to a dry and sad baked bird! It all starts by injecting a whole turkey with a butter marinade and refrigerating it for 24 hours. Cooked in a stock pot (outside!) in peanut oil at 350 degrees and fried for 3 ½ minutes per pound (for example, a 13-pound turkey will take about 45 ½ minutes). The recipe includes directions on clean-up and oil disposal.
Ingredients
- 1 - 12-14 Pound Turkey
- 1 Stick of Butter
- 1 Teaspoon Garlic Powder
- 1 Teaspoon White Pepper
- 1 Cup Cajun Spice Seasoning
- 4-5 Gallons of Peanut Oil
Instructions
Measuring the Pot for Oil
- DO THIS STEP FIRST!
- Once you have bought your turkey, place it inside your frying pot and fill the pot up with water until the bird is covered. Use can use your outdoor yard hose or a bathtub to make this easier than trying to do it in your kitchen sink (unless you have a big and deep sink).
- Remove the turkey from the pot and with a sharpie, mark on the outside of the pot where the water line is. Dump the water out.
- When it is time to fill up the pot with oil, fill this line. Using a water displacement method BEFORE you start frying is super important! DO NOT fill the pot up with oil, heat up, then place your turkey in unless you have measured how much oil you need. This will help prevent fires and hot oil from spilling out if overfilled.
Turkey Prep
- Place your frozen turkey in the fridge to thaw 7-9 days PRIOR to the day you need to cook. It takes about a week (give or take depending on how big your bird is) for a turkey to thaw out. A couple of extra days won't hurt.
- 24 hours before frying, remove from the fridge. Unwrap and remove any gravy packets, neck, and or giblets that are inside your turkey. Pat dry with paper towels and place in a large disposable pan or on a large baking sheet.
- Add a stick of butter to a small pot and place it on the stove on medium heat. Cook till melted then remove. Add garlic powder and white pepper to the melted butter and stir completely to mix in.
- Using a marinade injector, inject the melted butter mixture all over the turkey breast. It will take a couple of rounds of filling the injector up with the butter, but keep injecting all over the turkey breast and meat until the butter is used up.
- Next, rub the turkey down with a cajun spice blend. Make sure to get it all over the outside, under the skin, around the legs, and cover as much of it as possible.
- Wrap the pan and turkey tightly in plastic wrap and place them in the fridge to rest for 24 hours.
Frying Turkey
- Remove the turkey from the fridge and place it on the countertop for at least 30 minutes to come to room temp while you get your frying station prepped.
- Set up your frying station OUTSIDE and on the driveway or concrete. DO NOT set up on a porch, inside your home, on a deck, close to your house/anything that would catch on fire. Keep it in a wide-open clear space.
- Lay a couple of cardboard boxes that have been broken down on the driveway. This will help clean up any grease spills.
- Place the burner and propane take on the cardboard boxes. Make sure your propane tank is full and hooked up to the burner per your fryer instructions. Please read the instructions for your specific fryer PRIOR to setting this up. Most have multiple safety features (a timer, locks, etc) now.
- Fill your pot up with peanut oil to the fill line you marked on the outside of your pot. Place the inside frying basket inside. Put it on top of the burner.
- Open up the propane tank, turn the timer on, press the starter, and light the burner. Make sure the propane valve is switched all the way open to insure a large flame.
- Once the burner is lit, place the thermometer inside the pot, place the lid on and keep a watch on it while the oil heats up. This will take about 30ish minutes to reach 350 degrees. If your fryer has a timer on it (ours has a 15-minute timer - once those 15 minutes are up it flips off, killing the flame), keep an eye on it, turning the timer back every so often so that the flame stays going.
- Stay by the fryer at all times while this is heating up and the bird is cooking.
- Once the temperature of the oil has reached 350 degrees, the bird is ready to fry. Place the skewer through the middle of the bird, place it back in the baking tray, and bring it outside. Remove the lid from the fryer, place the hook on the skewer and very slowly lower the bird in the oil. The oil will bubble and splatter as you are lowering, just do it slowly so as not to burn yourself or splash any oil over.
- Once the bird is fully in the oil, remove your hook, place the lid back on, and start the timer for the exact cooking time - REFERENCE COOKING TIMES BELOW - you will fry for 3 ½ minutes per pound of turkey you have.
- Keep watch of the turkey while frying. Keep the timer and flame going. Do not leave it unattended. Get a clean pan or baking sheet for the cooked turkey, and place it directly next to the pot until needed.
- Once the time is up, gently remove the lid (wearing grilling gloves - it will be hot) hook the skewer and slowly lift the turkey out of the oil. Raise up slowly so that all the oil drain from the middle of the bird. Hold directly over the pot the entire time so the hot oil goes back into the pot.
- Once most of the oil has dripped off, carefully place it on the clean baking tray.
- Cover the pot with the lid. Turn off the flame and timer. Shut off the propane completely. Leave be to let it cool for the rest of the night.
- Bring the turkey inside and let rest for 20 minutes.
- Once ready, place the turkey on a platter, or carve the meat prior and place it on a platter to serve! The inside will still be hot, so I recommend using multiple pairs of disposable gloves while caring for the turkey since it will be very hot still.
- Enjoy!!
Oil Clean Up
- Leave the frying station to cool for 12-24 hours. I always like to leave for 24 hours just to make sure everything is completely cool.
- If this is your first time using your peanut oil, you should be able to get another use out of it. If your oil came in a big 3-5 gallon container, you can store it back in the same bin.
- Place the propane tank and burner away.
- Gently remove the inside frying basket and let drain oil as much as possible. Place on a trash bag to clean.
- Do this step over the cardboard that is still laid out. Place multiple trash bags over the cardboard area. Place the pot of oil over the trash bags.
- Using a large funnel (with a deep and wide mouth), place it over the opening of the oil container it came in.
- Slowly and carefully (and with help if you need it), pour the oil from the pot into the mouth of the funnel. Pour all of the clean oil back into the container, making sure to leave the bottom 10% out. That has the bits and pieces that have settled to the bottom. Screw the lid back on the oil container and store it away.
- Pour the remaining oil and remains into an old container with a lid. Wipe down the pot and liner down with paper towels as best as you can. Throw the used paper towels, trash bags, old oil remains, and cardboard away.
- Wash the inner liner, pot, and lid with Dawn dish soap outside with your hose. Wash and scrub everything down to cut and remove the grease. Wash the thermometer and hooks as well. Rinse everything and dry completely.
- Store away as desired.
- If you need to dispose completely of your oil - check online to see if your city recycles peanut oil. If not, place the used oil in a container with a lid tightly on it and dispose of it in your regular trash cans.
Notes
It takes 3 ½ minutes per pound of turkey that you have to fry and cook completely.
- 10 Pound Turkey - 35 minutes
- 12 Pound Turkey - 42 minutes
- 13 Pound Turkey - 45 ½ minutes
- 15 Pound Turkey - 52 ½ minutes
- 20 Pound Turkey - 70 minutes
- Prep Time: 24 hours
- Cook Time: 45 minutes
- Category: Dinner
- Method: Frying
- Cuisine: American
Nutrition
- Serving Size: 2 Slices
- Calories: 370
- Sugar: 0.6 g
- Sodium: 493.9 mg
- Fat: 9.5 g
- Carbohydrates: 3.8 g
- Fiber: 2.3 g
- Protein: 65.3 g
- Cholesterol: 167.2 mg