
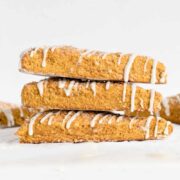
Soft pumpkin scones with a maple drizzle are irresistible, soft and the perfect addition to any fall or holiday table!
I love brunch. I am kinda majorly obsessed and crave all the brunch foods on the weekends. Brunch isn't a meal, it is an experience. A culture. The way weekends should be celebrated.
But I have a question for you...
Are you a savory or sweet kinda brunch person? Personally, I am savory all the way!
Grits, egg sammys, omelets, biscuits, and gravy.
Oh. My. Goodness.
If it's brunch at home though, I will always have something sweet for my sweet tooth of a husband and he has been loving these soft pumpkin scones with a maple drizzle recently!
Pumpkin scones are so easy to make and can be whipped up in no time for any brunch occasion. They are slightly sweet and are full of the warm fall pumpkin flavors we all love.
Jump to:

Ingredients Needed
Scones
- Flour
- Brown Sugar
- Baking Powder
- Cinnamon
- Pumpkin Pie Spice **
- Salt
- Canned Pumpkin Puree
- Butter
- Milk
- Cream & Turbinado Sugar
Glaze
- Powdered Sugar
- Maple Syrup
- Milk

Click here to watch a step-by-step Google Web Story!
PRO TIP for Making the BEST Scones
In my years of baking and learning from my mom, I have learned a couple of tricks a lot the way.
There are TWO important things I do to any scone, no matter the flavor, the yield a delicious treat!
ONE - grating in the COLD butter. You want the butter to be cold for all scones! Using cold butter ensures that it doesn't start melting before baking. That way the cold butter melts WHILE baking resulting in a flaky and perfect scone. Just like with pie crust. Using a cheese grater helps you get super fine flakes of butter and makes it easier to cut into the flour.
TWO - brush heavy cream on top and sprinkle with turbinado sugar. The cream gives scones a nice shine to the top making them look pretty AND even moister PLUS it helps the turbinado sugar stick to the tops. Make the scones light, fluffy, and flaky on the inside, and have a little crunch on the tops!


How to Make
Scones
- Preheat the oven to 450 degrees.
- In a large bowl, combine all the dry ingredients (including brown sugar). Whisk till combined.
- Grate the butter with a cheese grater.
- In another bowl, combine the pumpkin, butter, and milk. Whisking until well combined.
- Add the pumpkin mixture to the flour. Using a spatula, gently mix together, cutting the pumpkin mixture into the flour. This is a very thick and sticky batter.
- Lightly flour a surface and turn out the dough onto the flour. Sprinkle more on top and using your hands, pat the dough into a 6x10" rectangle. Slice the dough longways down the middle, making 2 - 3x10 rectangles. Cut the dough into fourths horizontally, but cutting right in the middle (4 - 3x5 rectangles) and then each one of those ins half again (8 - 3x2.5' rectangle). You can leave here to make bigger scones or continue to slice each of the rectangles at a diagonal leaving you with 16 triangles for smaller scones. Your preference.
- Place on a baking sheet lined with parchment paper. Gently brush the cream on the tops of the scones with a pastry brush and then sprinkle with turbinado sugar.
- Bake for 15 minutes.
- Once baked let cool and drizzle with maple glaze. Enjoy!
Glaze
- Combine maple syrup and powdered sugar in a small bowl. Whisk. Add milk and whisk combining all ingredients and until all lumps are gone. Drizzle over the top of the scones once they are cooled.
Tools I Use When Baking Scones
Here are a couple of tools I use when making scones, and just baking in general that are super helpful! (*all affiliate links)
- Pastry Cutter
- Pastry Brush
- Pastry Knife (used to slice the scones - a regular knife or cake scrapper edge can be used as well)
- Cheese Grater

How To Make Ahead of Time
I love making things ahead of time! And these scones can definitely be prepped in advance!
- Make it all the way up until baking. Place on a baking tray and wrap tightly in plastic wrap. Store in the fridge for up to 24 hours. Before baking, brush the tops with cream and sugar and bake as normal.
- Leftovers can be kept in the fridge for up to 2 days. Warm baking up in the microwave for about 10 seconds until warm and soft.
More Pumpkin Recipes
- Overnight Pumpkin Cinnamon Rolls
- Pumpkin Cookies with Brown Butter Icing
- Baked Pumpkin Donut Holes
- Old Fashioned Pumpkin Loaf with Cream Cheese Frosting
- Southern Pumpkin Pie
Recipe
Soft Pumpkin Scones with a Maple Drizzle
- Total Time: 25 minutes
- Yield: 8 1x
Description
Soft Pumpkin Scones with a Maple Drizzle are irresistible, soft, and the perfect addition to any fall or holiday table!
Ingredients
Scones
- 1 ¼ Cups Flour
- 2 Tablespoons Brown Sugar
- 4 Teaspoon Baking Powder
- 1 Teaspoon Cinnamon
- 1 Teaspoon Pumpkin Pie Spice **
- ½ Teaspoon Salt
- ¾ Cup Canned Pumpkin Puree
- ½ Stick Butter - cold
- 1 Tablespoons Milk
- Cream & Turbinado Sugar - for topping
Glaze
- 1 Cup Powdered Sugar
- 2 Tablespoon Maple Syrup
- 1 Tablespoon Milk
Instructions
Scones
- Preheat the oven to 450 degrees.
- In a large bowl, combine all the dry ingredients (including brown sugar). Whisk till combined.
- Grate the cold butter with a cheese grater.
- In another bowl, combine the pumpkin, butter, and milk. Whisking until well combined.
- Add the pumpkin mixture to the flour. Using a spatula, gently mix together. This is a very thick and sticky batter.
- Lightly flour a surface and turn out the dough onto the flour. Sprinkle more on top and using your hands, pat the dough into a 6x10" rectangle. Slice the dough longways down the middle, making 2 - 3x10 rectangles. Cut the dough into fourths horizontally, but cutting right in the middle (4 - 3x5 rectangles) and then each one of those ins half again (8 - 3x2.5' rectangle). You can leave here to make bigger scones or continue to slice each of the rectangles at a diagonal leaving you with 16 triangles for smaller scones. Your preference.
- Place on a baking sheet lined with parchment paper. Gently brush the cream on the tops of the scones with a pastry brush and then sprinkle with turbinado sugar.
- Bake for 15 minutes.
- Once baked let cool and drizzle with maple glaze. Enjoy!
Glaze
- Combine maple syrup and powdered sugar in a small bowl. Whisk. Add milk and whisk combining all ingredients and until all lumps are gone. Drizzle over the top of the scones once they are cooled.
Notes
If you do not have pumpkin pie spice, you can make your own by combining and storing in an airtight container:
- 4 Tablespoons Cinnamon
- 2 Teaspoons Ground Ginger
- 1 Teaspoon Nutmeg
- 1 Teaspoon Allspice
- ½ Teaspoon Ground Cloves
Keep leftovers in an airtight container in the fridge for 3-4 days. Pop in the microwave for 10-20 seconds to warm through.
- Prep Time: 20 minutes
- Cook Time: 15 minutes
- Category: Breakfast
- Method: Baking
- Cuisine: American
Nutrition
- Serving Size: 1 scone
- Calories: 72
- Sugar: 1.5 g
- Sodium: 76.5 mg
- Fat: 3 g
- Carbohydrates: 10.9 g
- Fiber: 0.8 g
- Protein: 1.2 g
- Cholesterol: 7.6 mg


Please clarify something for me. You have a note about the importance of grating the cold butter, yet the ingredients list and instructions mention melted butter. Thank you for clearing this up for me.
Jamie
Oh man! Opps! Thank you for catching that for me :/ Totally a miss on my part! The recipe works best with cold grated butter. I just fixed and updated - thanks!